No Knead Dutch Oven Bread
Highlighted under: Treats from the Oven
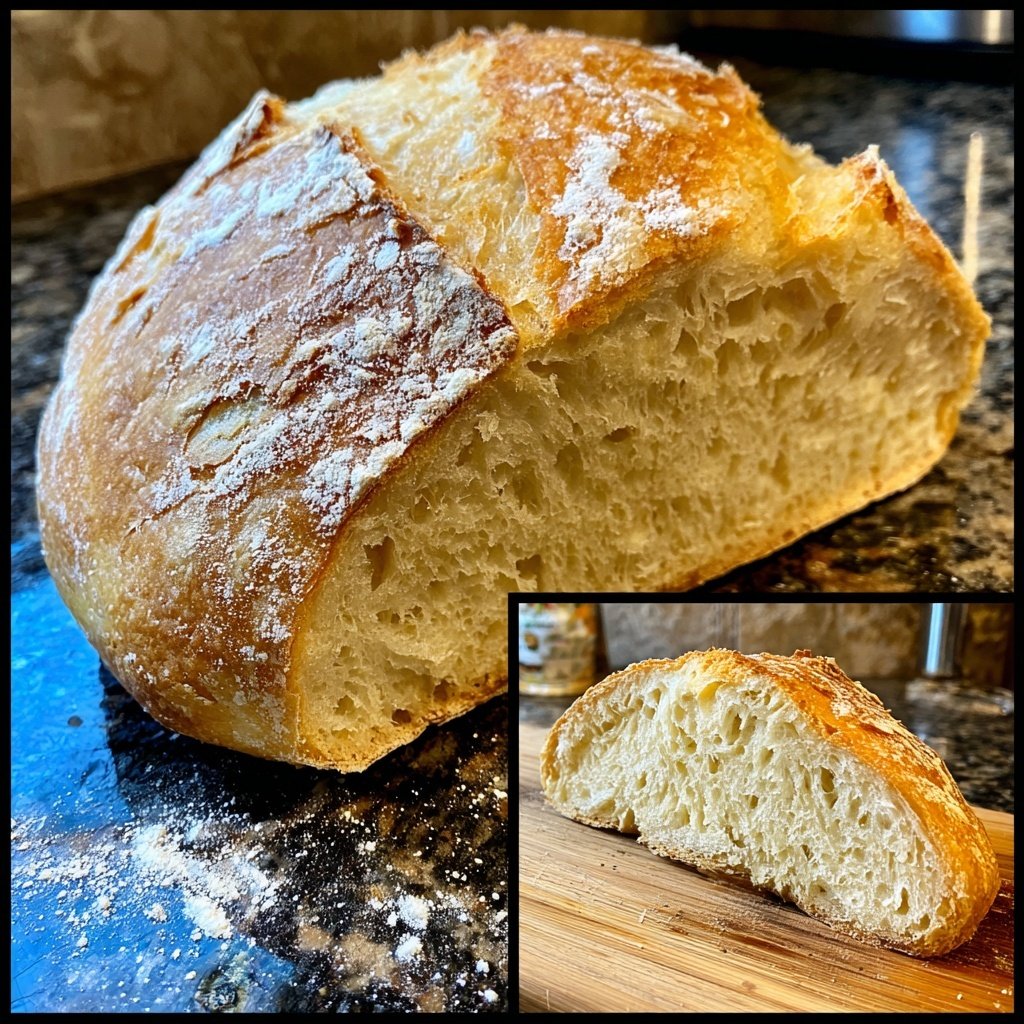
I absolutely love making No Knead Dutch Oven Bread at home! It's incredibly simple and requires minimal effort for a delicious loaf. The long fermentation times yield a deep, complex flavor with a crispy crust and airy crumb that would impress any bakery enthusiast. Just mix the ingredients and let the dough rest—this is the beauty of no-knead baking! I often find myself making it to accompany soups or to serve with a spread of my favorite jams. It’s quickly become a staple in my kitchen!
When I first tried making No Knead Dutch Oven Bread, I was amazed by how easy it was. With just a few ingredients, you can create a warm, comforting loaf that’s perfect for any meal. The way the steam captures the moisture in the oven allows the crust to form beautifully, and the dense interior makes for great sandwich-making.
One tip I learned is to let the dough rest for a long time—this not only enhances the flavor but also makes the bread much easier to shape. The results are nothing short of incredible!
Why You'll Love This Recipe
- A crusty exterior that gives way to a soft, airy interior.
- The simplicity of preparation makes it perfect for busy bakers.
- The long fermentation process enhances the flavor beautifully.
Understanding the Fermentation Process
The fermentation process is crucial in developing the distinctive flavor and texture of this No Knead Dutch Oven Bread. Allowing the dough to sit at room temperature for 12 to 18 hours enables the yeast to create gas bubbles, which contribute to the bread's airy structure. The longer the fermentation, the more complex the flavor becomes. Aim for a slightly tangy aroma when the dough is fully fermented, indicating the yeast has done its job properly.
During fermentation, the gluten develops naturally, which is why we don't knead the dough. If you're short on time, a minimum of 12 hours is acceptable, but be prepared to sacrifice some depth of flavor. On the other hand, letting the dough rise for 18 hours or more can lead to a wonderfully robust taste, reminiscent of artisanal breads found in gourmet bakeries.
Tips for Shaping and Scoring
Shaping the dough properly is essential for achieving a good rise during baking. After your first fermentation, gently deflate the dough to avoid losing too much air. Using floured hands, shape it into a ball by folding the edges into the center. Make sure to use enough flour to prevent sticking, but avoid excess flour that can dry out your bread. This is crucial for maintaining that soft, airy interior.
Before baking, scoring the top of the dough with a sharp knife or razor blade helps control the way the bread expands in the oven. Aim for a shallow cut, about 1/2 inch deep, as this allows for a beautiful oven spring—a significant rise occurring in the first few minutes of baking. A well-placed score can produce a stunning pattern on the crust, adding an aesthetic touch to your loaf.
Ingredients
Gather the following ingredients to start baking your own no knead bread:
Ingredients
- 3 cups all-purpose flour
- 1 1/4 teaspoons salt
- 1/2 teaspoon active dry yeast
- 1 1/2 cups warm water
With your ingredients ready, let's move on to the preparation!
Instructions
Follow these steps to bake the perfect No Knead Dutch Oven Bread:
Mix the Dough
In a large bowl, mix together the flour, salt, and yeast. Gradually add the warm water, stirring until a shaggy dough forms. Cover the bowl with plastic wrap and let it sit at room temperature for 12 to 18 hours.
Shape the Dough
Once the dough has rested, it will be bubbly and sticky. Flour your work surface and turn the dough out onto it. With floured hands, gently shape the dough into a ball. Let it rise again for about 1 hour.
Preheat the Oven
About 30 minutes before baking, place a Dutch oven with its lid inside your oven and preheat it to 450°F (230°C).
Bake the Bread
Carefully remove the hot Dutch oven. Place the dough ball inside (you may use parchment paper for easier removal), cover with the lid, and bake for 30 minutes. Remove the lid and bake for an additional 15 minutes until golden brown.
Cool and Serve
Once baked, transfer the bread to a wire rack to cool completely before slicing. Enjoy your delicious homemade bread!
Happy baking!
Pro Tips
- For added flavor, consider incorporating herbs or spices into the dough. Additionally, preheating the Dutch oven is key to achieving that perfect crust.
Ingredient Substitutions
If you're out of all-purpose flour, bread flour is a fantastic substitute due to its higher protein content, which will yield chewier bread. For a gluten-free option, consider using a gluten-free all-purpose flour blend combined with a teaspoon of xanthan gum to help mimic the texture. Adjust the liquid slightly, as some gluten-free flours absorb more moisture than regular flour.
In terms of yeast, if you have instant yeast on hand, you can use it in place of active dry yeast without altering the quantity. Instant yeast can be mixed directly into the dry ingredients and doesn’t need to be activated in warm water. Just keep an eye on rising times, as they could differ slightly due to the yeast type.
Storage and Reheating
Once your bread has cooled completely, store it in a paper bag or wrapped in a clean kitchen towel at room temperature to maintain its crustiness. Avoid plastic bags as they trap moisture, making the crust soft. The bread is best enjoyed within a couple of days; however, if you need to keep it longer, slice it and freeze it in an airtight container for up to three months.
To reheat, simply place the frozen slices in a preheated oven at 350°F (175°C) for about 10-15 minutes or until warmed through. This will help revive the crust’s crispiness. Alternatively, a quick toast in a skillet can also do wonders for bread that has lost its original texture.
Questions About Recipes
→ Can I use whole wheat flour?
Yes, you can substitute part of the all-purpose flour with whole wheat flour for a heartier loaf.
→ How do I store leftover bread?
Store any leftover bread in a paper bag at room temperature for up to 3 days or slice and freeze for longer storage.
→ What if my dough doesn't rise?
Ensure your yeast is fresh and your dough has enough warmth during the resting period to promote rising.
→ Can I make this recipe gluten-free?
You can try using a gluten-free flour blend, but the texture and flavor may vary from the traditional bread.

No Knead Dutch Oven Bread
Created by: Ottilie James
Recipe Type: Treats from the Oven
Skill Level: Beginner
Final Quantity: 1 loaf
What You'll Need
Ingredients
- 3 cups all-purpose flour
- 1 1/4 teaspoons salt
- 1/2 teaspoon active dry yeast
- 1 1/2 cups warm water
How-To Steps
In a large bowl, mix together the flour, salt, and yeast. Gradually add the warm water, stirring until a shaggy dough forms. Cover the bowl with plastic wrap and let it sit at room temperature for 12 to 18 hours.
Once the dough has rested, it will be bubbly and sticky. Flour your work surface and turn the dough out onto it. With floured hands, gently shape the dough into a ball. Let it rise again for about 1 hour.
About 30 minutes before baking, place a Dutch oven with its lid inside your oven and preheat it to 450°F (230°C).
Carefully remove the hot Dutch oven. Place the dough ball inside (you may use parchment paper for easier removal), cover with the lid, and bake for 30 minutes. Remove the lid and bake for an additional 15 minutes until golden brown.
Once baked, transfer the bread to a wire rack to cool completely before slicing. Enjoy your delicious homemade bread!
Extra Tips
- For added flavor, consider incorporating herbs or spices into the dough. Additionally, preheating the Dutch oven is key to achieving that perfect crust.
Nutritional Breakdown (Per Serving)
- Calories: 400 kcal
- Total Fat: 1g
- Saturated Fat: 0g
- Cholesterol: 0mg
- Sodium: 600mg
- Total Carbohydrates: 85g
- Dietary Fiber: 3g
- Sugars: 0g
- Protein: 12g